Best Kayak J-Racks in 2026: Why People Love Them

The first kayak rack I ever bought was a J-rack, and I bought it for the simplest possible reason — a guy at the put-in had one and it looked like it worked. That was over a decade ago, and while I've tested every type of carrier since then, J-racks remain the most popular kayak carrier on the market for good reason. They're affordable, they're space-efficient, they work with virtually any kayak, and once you nail the loading technique, you can have your boat on the roof and strapped down in under five minutes.
But not all J-racks are created equal, and the difference between a good one and a mediocre one becomes very apparent after a few dozen trips. Cheap padding wears out, flimsy mounting hardware rattles, and poorly designed cradles let kayaks shift in crosswinds. I've run through enough J-racks to know what matters, what doesn't, and which ones are worth your money in 2026. Let me break it all down.
What Is a J-Rack and How Does It Work?
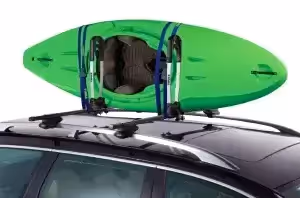
A J-rack is a kayak carrier shaped like the letter J (or a sideways U, depending on how you look at it). It mounts to your vehicle's crossbars and holds the kayak on its side, tilted at roughly a 45-degree angle. The J-shaped cradle supports the hull and deck, and straps secure the kayak in place.
The genius of the design is the angle. By tilting the kayak on its side, a J-rack uses significantly less crossbar width than a flat saddle carrier. A kayak that's 28 inches wide when sitting flat might only use 16-18 inches of crossbar space when tilted in a J-rack. That freed-up space means you can fit two J-racks side by side on many vehicles, or run a J-rack alongside a cargo box, bike rack, or other accessory.
Why J-Racks Are So Popular
Space Efficiency
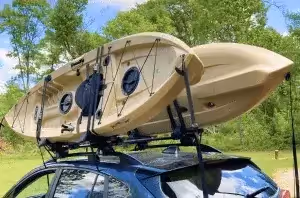
This is the number one advantage. No other carrier style uses as little roof space per kayak. If you have a standard-width vehicle with 45-50 inch crossbars, you can usually fit two J-racks side by side. That's two kayaks on one roof without any exotic equipment. For couples and paddling partners, this is the most practical and affordable way to carry both boats.
I've run two J-racks on a mid-size sedan for years. Two whitewater boats side by side, one pointing forward and one pointing backward (alternating direction helps with clearance), and I still had a few inches of crossbar free on each side. It's a clean, efficient setup that doesn't make the car feel overloaded.
Affordability
J-racks are the least expensive carrier type for the quality you get. A perfectly good pair of J-racks costs $80-$150, which is less than most saddle systems and a fraction of what lift-assist carriers cost. When you're already spending hundreds on a kayak and paddle, keeping the rack cost under $150 feels like a win. For a full breakdown of what you'll spend, our kayak rack cost guide covers all the numbers.
Versatility
J-racks work with virtually every kayak shape — narrow whitewater boats, wide recreational kayaks, long touring boats, and sit-on-tops. The J-shaped cradle accommodates a range of hull widths, and the strap system can be adjusted to fit almost anything. I've carried everything from a 9-foot whitewater playboat to a 16-foot touring kayak on the same J-racks without any modifications.
Easy Installation
Most modern J-racks mount to crossbars with a U-bolt or clamp system that requires no drilling and minimal tools. You can install a pair in 20-30 minutes, and once they're on, they stay on. Many paddlers leave their J-racks mounted all season, only removing them for winter storage or car washes.
Loading Technique: The Key to J-Rack Success
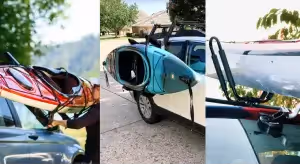
The most common complaint about J-racks is loading difficulty, and I won't sugarcoat it — lifting a kayak onto a J-rack requires more technique than loading onto a flat saddle carrier. You need to get the kayak up to crossbar height and tilt it into the J-cradle at the correct angle. Here's the technique I teach, refined over thousands of loading cycles.
Step 1: Stand at the rear of the vehicle with the kayak on the ground beside you, bow pointing toward the front of the car.
Step 2: Lift the bow and rest it on the rear crossbar. The kayak is now angled — bow resting on the bar, stern on the ground — and you're only supporting the stern's weight.
Step 3: Walk the stern around toward the rack side of the vehicle, lifting it as you go, and slide the kayak forward along the crossbar until it's positioned between the front and rear J-cradles.
Step 4: Tilt the kayak into the J-cradles. It should nestle in with the hull against the vertical part of the J and the deck resting on the horizontal part.
Step 5: Secure with straps. Loop the straps over the kayak and through or around the J-rack, then cinch them tight. Add bow and stern tie-down lines for highway driving.
This technique uses the crossbar as a pivot point, so you're never dead-lifting the full weight of the kayak straight up. Once you've done it a few times, it becomes muscle memory. I can load my boat in under two minutes without thinking about it.
My Top J-Rack Picks for 2026
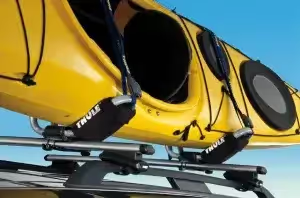
Thule Hull-a-Port XT
Thule's flagship J-rack has been refined over many product generations, and the current XT version is the best yet. The folding design lets you fold the J-cradle flat against the crossbar when not in use, reducing wind noise and visual clutter. The padding is thick and durable — I've had a set for three seasons and the pads show minimal wear. Tool-free mounting works with Thule, Yakima, and most aftermarket crossbars. At $180-$220 for a pair, it's premium pricing, but the build quality justifies it.
Best for: Frequent paddlers who want a set-it-and-forget-it rack that'll last for years.
Yakima JayLow
The JayLow is Yakima's answer to the Hull-a-Port, and it's a very close competitor. It also folds flat, has excellent padding, and mounts without tools. One feature I particularly like is the adjustable angle — you can set the J-cradle position to accommodate different kayak widths. It's priced at $170-$200 for a pair, making it a slight value edge over the Thule.
Best for: Paddlers who own multiple kayaks of different widths and want one rack that adjusts to fit all of them.
Malone DownLoader
Malone's DownLoader is the J-rack that folds all the way down to a flat position AND all the way out to a nearly horizontal saddle position. It's essentially a J-rack and a saddle carrier in one, depending on how you adjust it. This versatility is great if you're not sure whether J-style or flat mounting will work better for your kayak. At $120-$160 for a pair, it's excellent value for a rack that does double duty.
Best for: Paddlers who want flexibility and aren't sure which mounting style they prefer.
SportRack SR5511
This is the budget king. At $70-$90 for a pair, the SR5511 is the least expensive quality J-rack on the market. It doesn't fold, it doesn't adjust, and the padding is thinner than premium options. But it holds a kayak securely, it mounts to standard crossbars, and it gets the job done. I've recommended this rack to dozens of beginner paddlers, and the feedback has been consistently positive. If you paddle 5-10 times per season and you don't want to spend $200 on a carrier, this is the one to buy.
Best for: Budget-conscious paddlers and beginners who want a reliable rack without premium features.
Thule Hullavator Pro (Honorable Mention)
Technically a lift-assist rack rather than a pure J-rack, but I'm mentioning it here because it loads like a J-rack with the added benefit of gas-assist lifting. If you love the J-rack concept but struggle with the overhead loading, the Hullavator is the premium solution. At $500-$600 per side, it's a serious investment, but for paddlers with physical limitations or very heavy kayaks, it's transformative.
Common J-Rack Mistakes (and How to Avoid Them)
Over the years, I've seen the same mistakes repeated by J-rack users. Here are the big ones and how to fix them.
- Not using bow and stern lines. J-racks rely on crossbar straps to hold the kayak in position. Those straps resist vertical and lateral movement, but they don't do much to prevent the kayak from sliding forward or backward along the crossbar during hard braking or acceleration. Bow and stern lines anchor the kayak to the front and rear of the vehicle, preventing fore-and-aft sliding. Use them. Always.
- Over-tightening straps. You want the straps snug, not gorilla-tight. Over-tightened straps — especially ratchet straps — can deform plastic hulls, crack gel coat on composite kayaks, and even warp the J-rack cradle over time. Tighten until the kayak doesn't move when you push on it, then stop.
- Loading cockpit-down. The kayak should sit in the J-rack with the cockpit facing away from the vehicle — outward or upward. If the cockpit faces down, rain and road spray collect inside and you'll arrive at the put-in with a kayak full of dirty water.
- Ignoring crossbar spacing. Your front and rear crossbars should be far enough apart that the J-racks support the kayak at two distinct points. If the crossbars are too close together, the kayak is essentially balanced on a single point and can pivot. Most manufacturers recommend at least 24 inches between crossbar centers.
J-racks earned their popularity. They're the do-everything, fit-everything, don't-break-the-bank kayak carrier that works for 80% of paddlers in 80% of situations. If you're buying your first kayak rack and you're not sure what you need, start with a quality J-rack. You'll learn what you like and don't like about it, and that experience will inform whatever you buy next — whether that's a second pair of J-racks, a switch to saddle carriers, or an upgrade to a lift-assist system.
The key is buying quality. A cheap J-rack that rattles, has thin padding, and uses flimsy hardware will sour you on the whole concept. A well-made J-rack from any of the brands I've recommended above will serve you for years, trip after trip, and make you wonder why you ever considered hauling your kayak any other way. Pick one, mount it up, learn the loading technique, and go find some water. That's the whole point.